Setting up the environment
This page will get you started for creating a MO2 python plugin. If you have troubles getting everything setup, feel free to come by our discord server at https://discord.gg/cYwdcxj.
Required tools
It is possible to write a MO2 python plugin using any text editor, but this guide will focus on Visual Studio Code. This guide assumes that:
You have Visual Studio Code installed with the Python extension.
You have Python installed: https://www.python.org/downloads/.
You must use the Python version that used by MO2. You can check the
pythonXX.dllin the MO2 installation folder to find the Python version used by MO2 (python38.dllmeans Python 3.8).
You obviously need a valid MO2 installation: https://github.com/modorganizer2/modorganizer/releases
This guide is written for MO2 ≥ 2.3.0.
Note: In the following, I will refer to the MO2 installation directory as $MO2DIR. So if you
installed MO2 at C:\MO2 and you are asked to copy a file to $MO2DIR/plugins, it refers to C:\MO2\plugins.
Preparation
Note: This part is optional but highly recommended if you want a proper environment to work with. Everything here is written to be as simple as possible but you can of course adapt it to your preferences: use a python virtual environment, use workspace settings instead of global ones, etc.
1. Get the mobase stubs
mobase is the MO2 Python module. The module is written in C++ and thus cannot be read directly by tools such
as flake8 or mypy.
Instead, we provide stubs
which can be used for auto-completion or type-checking.
You can install the stubs for mobase using pip:
pip install mobase-stubs
This will install the stubs for mobase but also for PyQt5, which is heavily used by MO2.
2. Configure Visual Studio Code for mobase
We are going to configure Visual Studio Code to have auto-completion and linting (error and type checking)
for the MO2 Python module.
Open settings.json (Ctrl+Shift+P, then “Open Settings (JSON)”), and add the following entries:
"python.linting.enabled": true,
"python.linting.mypyEnabled": true,
"python.linting.flake8Enabled": true,
3. [Optional] Configure black to auto-format your source files
This step is optional for your own plugin but recent MO2 plugins use black
to get consistent formatting.
You can install black with pip:
pip install black flake8-black
To configure Visual Studio Code to auto-format your code with black when saving, open settings.json
(Ctrl+Shift+P, then “Open Settings (JSON)”), and add the following entries:
"editor.formatOnSave": true,
"editor.formatOnPaste": true,
"python.formatting.provider": "black",
4. [Optional] Automatically reload plugins during development
This section is optional and requires you to already have written a “working” plugin (a plugin that MO2 can load).
Since MO2 2.4 alpha 6, a new command has been added to ModOrganizer.exe to
reload plugins during execution.
If your plugin is named “My Plugin”, you can use the following command to reload
it while MO2 is running:
$MO2DIR\ModOrganizer.exe reload-plugin "My Plugin"
If you are using Visual Studio Code, you can send this command to MO2 automatically after saving files from your project.
Create a “reload plugin” task in Visual Studio Code (Ctrl+Shift+P then
Tasks: Configure taskor open.vscode/tasks.json) using the following snippet (replace the name and directory as needed):
// .vscode/tasks.json
{
    // See https://go.microsoft.com/fwlink/?LinkId=733558
    // for the documentation about the tasks.json format
    "version": "2.0.0",
    "tasks": [
        {
            "label": "reload plugin",
            "type": "shell",
            "command": "$MO2DIR/ModOrganizer.exe",
            "args": [
                "reload-plugin", "My Plugin"
            ]
        }
    ]
}
Install the Trigger Task on Save extension from Visual Studio Code marketplace.
Add the following to your Visual Studio Code settings (
.vscode/settings.json)
// .vscode/settings.json
{
    "triggerTaskOnSave.on": true,
    "triggerTaskOnSave.tasks": {
        "reload plugin": [
            "*.py"
        ]
    }
}
Testing the setup
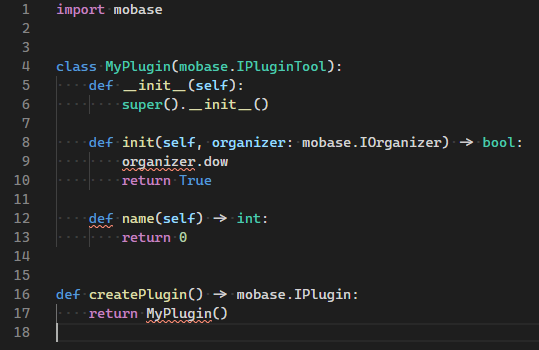
Create a new Python file in Visual Studio Code, and paste the following content (if you create
the file in $MO2DIR\plugins, do not forget to delete it after since it is not a valid
plugin):
import mobase


class MyPlugin(mobase.IPluginTool):
    def __init__(self):
        super().__init__()

    def init(self, organizer: mobase.IOrganizer) -> bool:
        organizer.dow  # (1)
        return True

    def name(self) -> int:
        return 0


def createPlugin() -> mobase.IPlugin:
    return MyPlugin()
If your setup is valid, here is what you should have.
You should see the following (with the errors underlined):
If you press
Ctrl+Spaceafter.down(1), you should see the following meaning that auto-complete is working:

In the error window (click
 on the status bar), you should see
the 3 following errors:
on the status bar), you should see
the 3 following errors:

If everything is as above, you can delete the test file and move on to writing your own plugin!